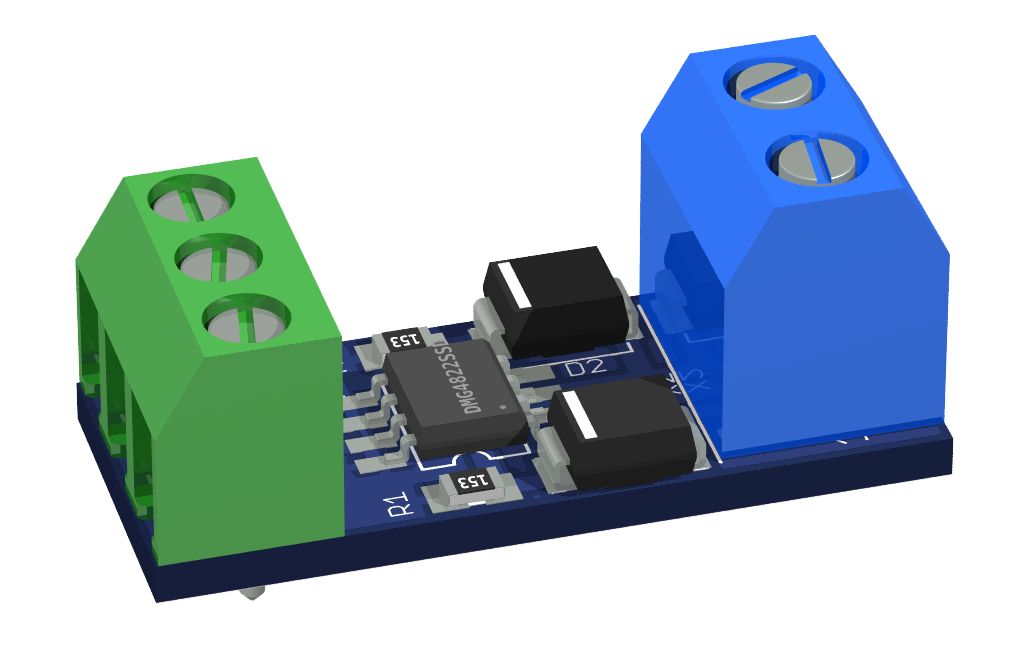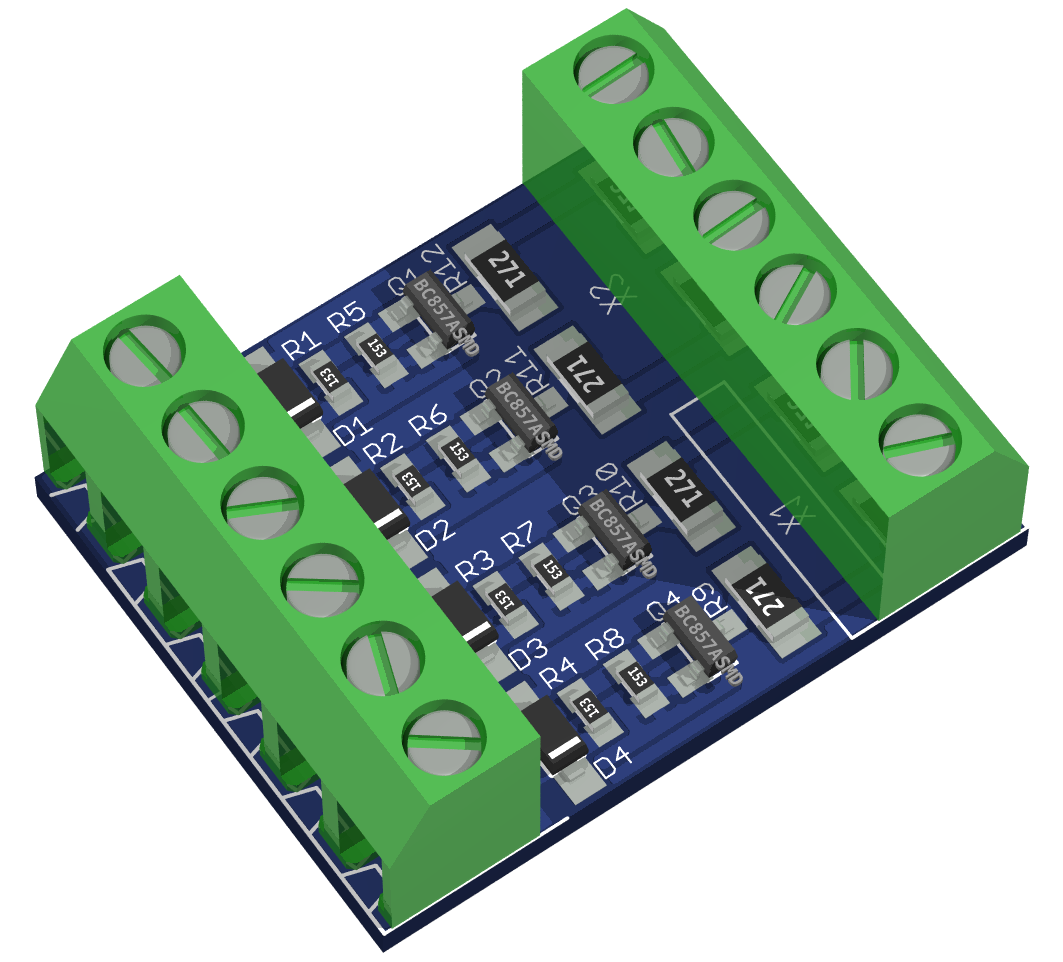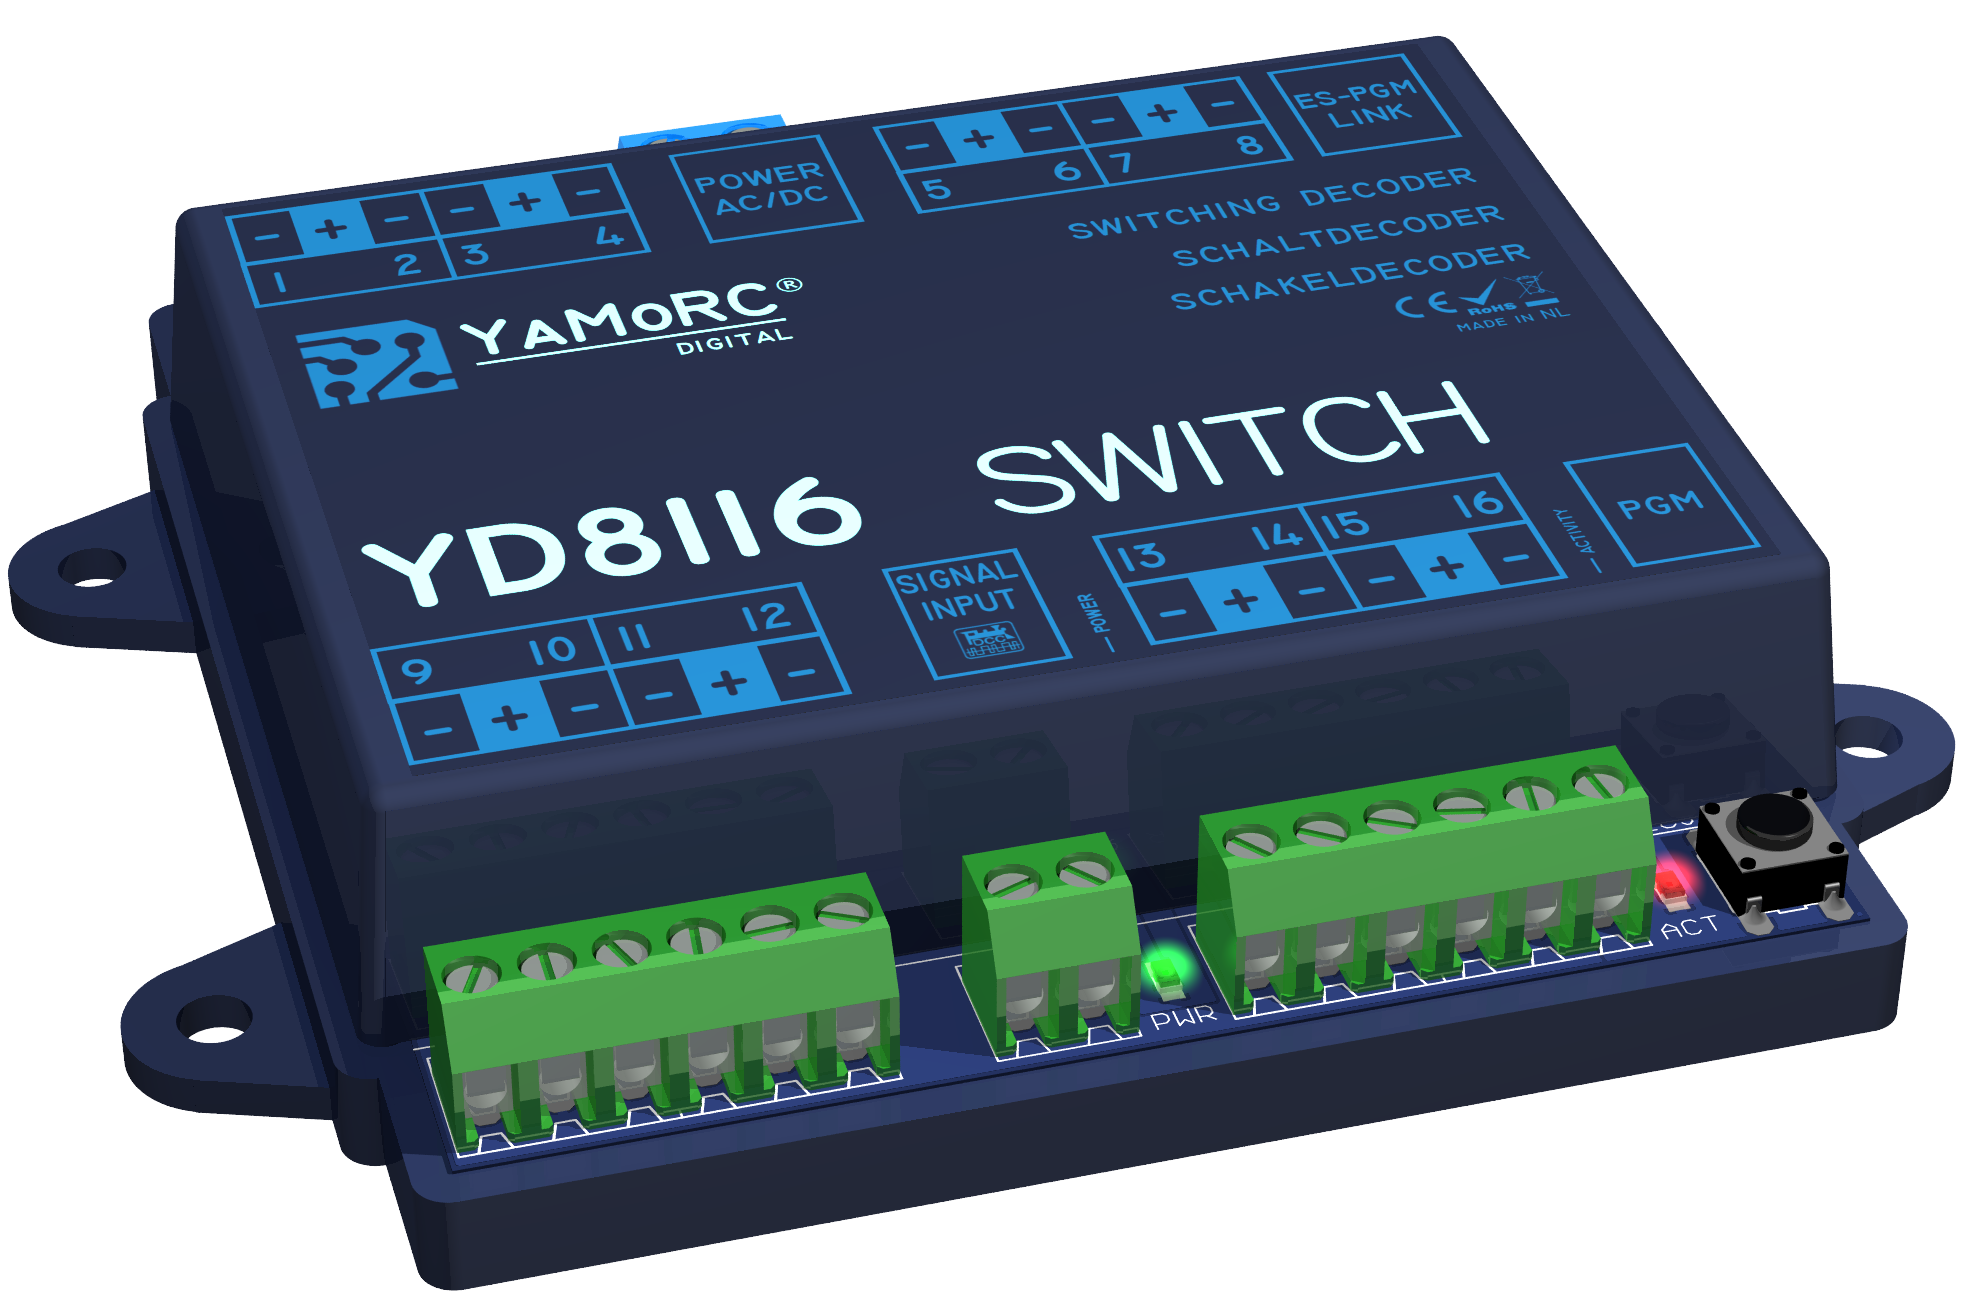
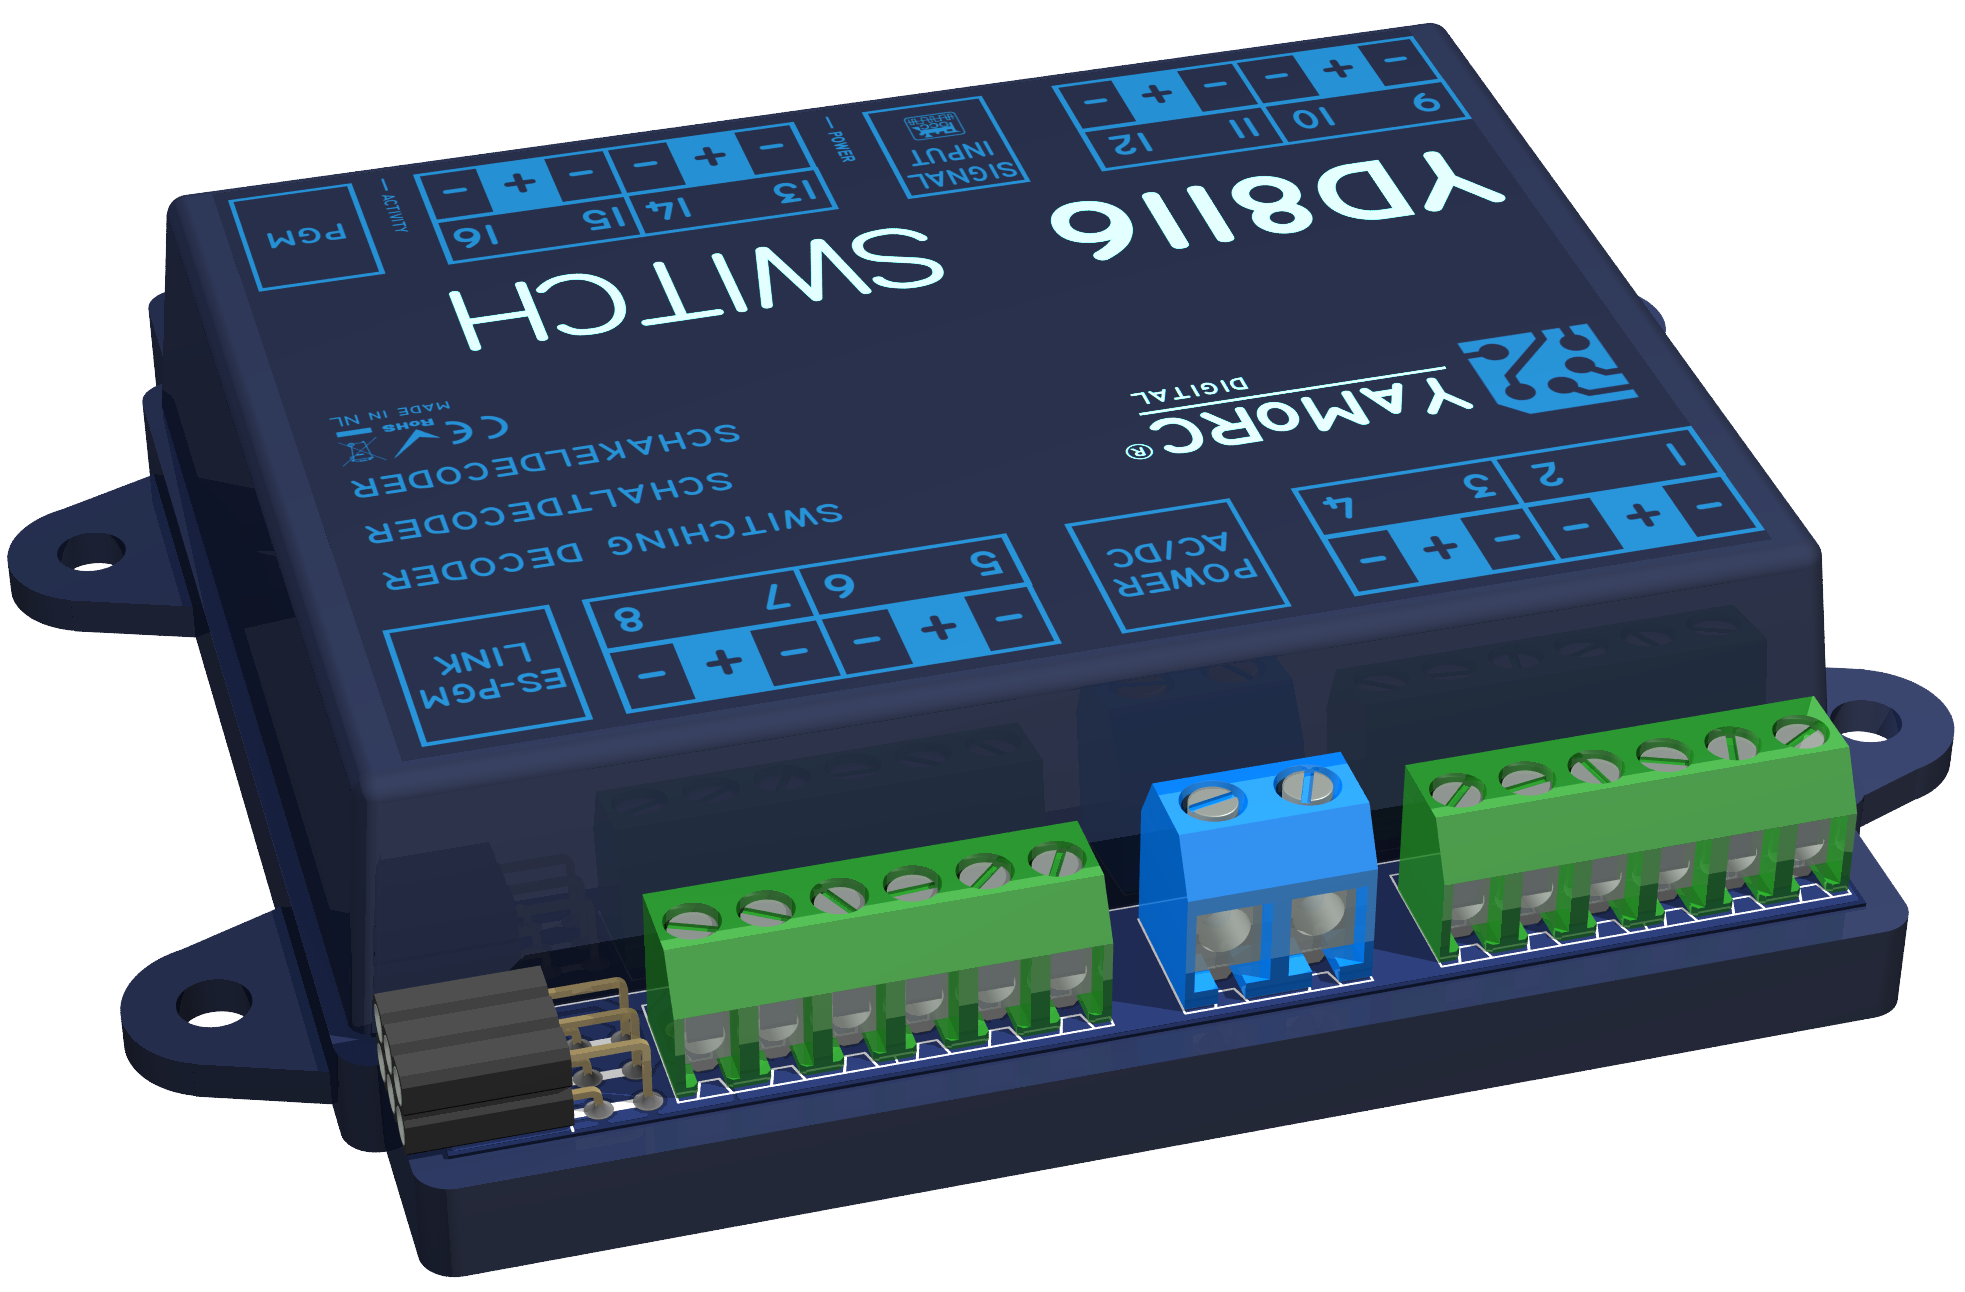

YD8116
€68.50
The YaMoRC solution for switching and signaling: our 16-fold signal/switching decoder.
It presents the following features:
- Sixteen independent 2.5Amp MOSFET outputs
- Max 5 Amp combined current
- Very simple basic-setup (base address), by pressing the programming button and switching the desired turnout address
- No complicated CV settings.
- Clear-text configuration based upon our new ES-Link technology.
With our YD9101-Config or YD7100-Command, configuration can be done via built-in web interface: No need for PC-software or Phone/Tablet Apps!.
- or -
when using the classic Windows PC interface, the YD9100 config-USB-stick as well as our YD6016LN can provide the configuration. - All of the 16 outputs are freely configurable from 16x simple on-off to complex and elaborate signals with up to 8 LEDs/lamps
- Each defined device (signal, switch, turnout) can have its own address
- Devices can be operated by the new DCCext standard or conventional turnout DCC-commands (throw/close)
- Numerous predefined signal definitions for Dutch, German (H/V, Ks and Form) British and Swiss prototypical signals
- Signals can include fading (Bulbs emulated in case of LEDs) dark-phase inclusion, black-out based on previous signal’s state
- Outputs can be time-limited e.g. for light coil-motors
- Settable night-dimming for the complete decoder, with configurable address / decoder
- Very suitable for motorized point motors.
- Not suitable for solenoid point motors. For these motors, use our YD8008/YD8044.
- For two-wire motorized point motors, like Conrad; Hoffmann; Tillig; etc. adapter YD6940 should be used.
Product Question
Products
Yes it can. That is, the YD8044 will sequentially switch the assigned turnouts in left to right order as seen in the image below.
Depending on how quickly the CDU will be recharged, the switching will appear more or less simultaneous.
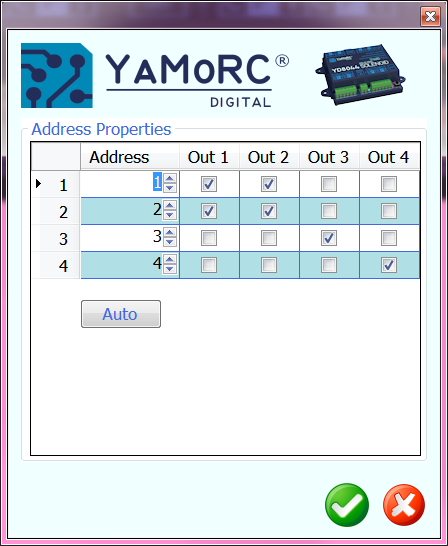
Here Address #1 switches turnout on Out 1 and after that turnout on Out 2.
The YD8044 has very modest requirements on it’s power supply.
Due to it’s built-in CDU, the power supply never has to supply the switching coil-current. (which may be as high as 10 Amps)
The CDU charge current tops at a maximum of 350 mA at 19 V input voltage. So a 15 V / 0.5 Amp wall-wart adapter is fully sufficient to supply the YD8044.
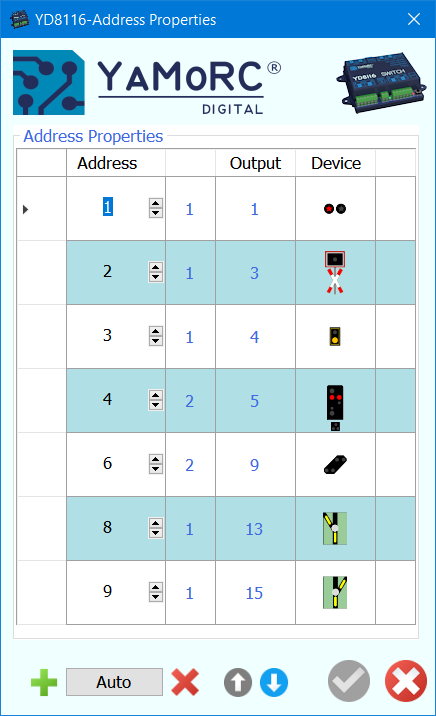
Our YD8116 can be controlled either via “normal” DCC turnout addresses or via the relatively new DCCext format.
Briefly summarized, the difference:
With multi-aspect signals, switching via “normal” DCC addresses can become complicated. Different DCC switching commands must be combined in a certain time and sequence. This, of course, also consumes several DCC addresses.
If the DCCext format is used, only one DCC address is needed to control the different signal aspects for multi-aspect signals.
control. To the DCC address simply a value from 0 to 255 is sent. A specific signal aspect can be individually assigned to each value.
What is the advantage of DCCext?
- No complicated DCC address combinations have to be switched!
- The use of DCCext saves normal turnout addresses!
- Thus, as an example, for a DB H/V exit signal with four aspects, only one single turnout address is required, whereas conventionally two or more DCC addresses are required.
- Up to 255 switching aspects can be freely assigned.
For more detailed information, please refer to the RCN-213 standard. Please note that the command station you are using must support the DCCext format.
Comparing the DR5000 to an YD7001, one sees the following benefits:
- Mixed protocol environment possible, e.g. WLANmaus and HandyApp via Z21 and Traincontroller via Xpressnet, WDP or iTrain via LocoNet LAN.
- Use of LAN for Tool and MRR Software, as many have problems with USB.
- More WLAN clients than before.
- Feedback is no longer eaten away when using app and control software at the same time.
- USB stabilised with e.g. iTrain, WDP etc.
- New control panel that can be freely configured.
- DCCext signal control
- Loco functions up to 64
- Pom accessory decoder with corresponding hardware
- Distinction between emergency off and emergency stop without track voltage off.
- Indication of which connection to the YD7001 is currently active by green colouring of the corresponding COM port or the IP
- ES-Link functionality
- Improved feedback monitor both visually and technically (for example, the bell function)
- Guaranteed software maintenance
- Genuine technical support
In certain circumstances, the YD8008/8044/8116 modules can become “bricked”.
That means, they are not accessible anymore after a firmware update, configuration attempt or a settings import.
Usually that shows by not being “seen” anymore in the configuration program and/or no LEDs lighting up anymore.
The procedure to get your module “back to life” is this:
(the example is for the YD8116. For other modules substitute YD8116 with the name of your module)
ENGLISH
- look for YD8116.exe in the installation folder.
- connect the YD9100 to USB, but not yet to the YD8116.
- start YD8116.exe with a double-click.
- go directly to “ES-PGM” and click on “Update YD8116”.
- after a short moment the message “Connect your device in bootloader mode” will appear, do not yet click OK now!
- Press and hold the programming button on the YD8116.
- plug the YD9100 into the ES-PGM-LINK of the YD8116.
- as soon as the red LED lights up, click OK while the programming button is still pressed.
- when the green LED starts flashing rapidly, the button can be released.
- when updating is complete, click Restore factory settings.
DEUTSCH
- Suchen Sie im Installationsordner nach YD8116.exe.
- Verbinden Sie den YD9100 mit USB, aber noch nicht mit dem YD8116.
- starten Sie YD8116.exe mit einem Doppelklick.
- gehen Sie direkt zu “ES-PGM” und klicken Sie auf “Aktualisiere YD8116”.
- nach einem kurzen Moment erscheint die Meldung “Connect your device in bootloader mode”, klicken Sie jetzt noch nicht auf OK!
- Drücken und halten Sie die Programmiertaste am YD8116.
- stecken Sie das YD9100 in den ES-PGM-LINK des YD8116.
- Sobald die rote LED aufleuchtet, klicken Sie auf OK, während Sie die Programmiertaste gedrückt halten.
- Wenn die grüne LED schnell zu blinken beginnt, kann die Taste losgelassen werden.
- Wenn die Aktualisierung abgeschlossen ist, klicken Sie auf Werkseinstellung Zurücksetzen.
NEDERLANDS
- zoek in de installatie map naar YD8116.exe.
- verbind de YD9100 met USB, maar nog niet met de YD8116.
- start YD8116.exe met een dubbelklik.
- ga direct naar “ES-PGM” en klik op “Update YD8116”.
- na een klein moment verschijnt er de melding “Connect your device in bootloader mode”, nu nog niet op OK klikken!
- druk het programmeer knopje op de YD8116 in en houd deze ingedrukt.
- steek de YD9100 in de ES-PGM-LINK van de YD8116.
- zodra de rode LED brandt, klik op OK terwijl het programmeerknopje nog ingedrukt is.
- als de groene LED snel begint te flikkeren, kan het knopje losgelaten worden.
- als het updaten klaar is, klik dan op Fabrieksinstellingen terugzetten.
YD8008
In certain circumstances, the YD8008/8044/8116 modules can become “bricked”.
That means, they are not accessible anymore after a firmware update, configuration attempt or a settings import.
Usually that shows by not being “seen” anymore in the configuration program and/or no LEDs lighting up anymore.
The procedure to get your module “back to life” is this:
(the example is for the YD8116. For other modules substitute YD8116 with the name of your module)
ENGLISH
- look for YD8116.exe in the installation folder.
- connect the YD9100 to USB, but not yet to the YD8116.
- start YD8116.exe with a double-click.
- go directly to “ES-PGM” and click on “Update YD8116”.
- after a short moment the message “Connect your device in bootloader mode” will appear, do not yet click OK now!
- Press and hold the programming button on the YD8116.
- plug the YD9100 into the ES-PGM-LINK of the YD8116.
- as soon as the red LED lights up, click OK while the programming button is still pressed.
- when the green LED starts flashing rapidly, the button can be released.
- when updating is complete, click Restore factory settings.
DEUTSCH
- Suchen Sie im Installationsordner nach YD8116.exe.
- Verbinden Sie den YD9100 mit USB, aber noch nicht mit dem YD8116.
- starten Sie YD8116.exe mit einem Doppelklick.
- gehen Sie direkt zu “ES-PGM” und klicken Sie auf “Aktualisiere YD8116”.
- nach einem kurzen Moment erscheint die Meldung “Connect your device in bootloader mode”, klicken Sie jetzt noch nicht auf OK!
- Drücken und halten Sie die Programmiertaste am YD8116.
- stecken Sie das YD9100 in den ES-PGM-LINK des YD8116.
- Sobald die rote LED aufleuchtet, klicken Sie auf OK, während Sie die Programmiertaste gedrückt halten.
- Wenn die grüne LED schnell zu blinken beginnt, kann die Taste losgelassen werden.
- Wenn die Aktualisierung abgeschlossen ist, klicken Sie auf Werkseinstellung Zurücksetzen.
NEDERLANDS
- zoek in de installatie map naar YD8116.exe.
- verbind de YD9100 met USB, maar nog niet met de YD8116.
- start YD8116.exe met een dubbelklik.
- ga direct naar “ES-PGM” en klik op “Update YD8116”.
- na een klein moment verschijnt er de melding “Connect your device in bootloader mode”, nu nog niet op OK klikken!
- druk het programmeer knopje op de YD8116 in en houd deze ingedrukt.
- steek de YD9100 in de ES-PGM-LINK van de YD8116.
- zodra de rode LED brandt, klik op OK terwijl het programmeerknopje nog ingedrukt is.
- als de groene LED snel begint te flikkeren, kan het knopje losgelaten worden.
- als het updaten klaar is, klik dan op Fabrieksinstellingen terugzetten.
YD8044
Yes it can. That is, the YD8044 will sequentially switch the assigned turnouts in left to right order as seen in the image below.
Depending on how quickly the CDU will be recharged, the switching will appear more or less simultaneous.
Here Address #1 switches turnout on Out 1 and after that turnout on Out 2.
The YD8044 has very modest requirements on it’s power supply.
Due to it’s built-in CDU, the power supply never has to supply the switching coil-current. (which may be as high as 10 Amps)
The CDU charge current tops at a maximum of 350 mA at 19 V input voltage. So a 15 V / 0.5 Amp wall-wart adapter is fully sufficient to supply the YD8044.
In certain circumstances, the YD8008/8044/8116 modules can become “bricked”.
That means, they are not accessible anymore after a firmware update, configuration attempt or a settings import.
Usually that shows by not being “seen” anymore in the configuration program and/or no LEDs lighting up anymore.
The procedure to get your module “back to life” is this:
(the example is for the YD8116. For other modules substitute YD8116 with the name of your module)
ENGLISH
- look for YD8116.exe in the installation folder.
- connect the YD9100 to USB, but not yet to the YD8116.
- start YD8116.exe with a double-click.
- go directly to “ES-PGM” and click on “Update YD8116”.
- after a short moment the message “Connect your device in bootloader mode” will appear, do not yet click OK now!
- Press and hold the programming button on the YD8116.
- plug the YD9100 into the ES-PGM-LINK of the YD8116.
- as soon as the red LED lights up, click OK while the programming button is still pressed.
- when the green LED starts flashing rapidly, the button can be released.
- when updating is complete, click Restore factory settings.
DEUTSCH
- Suchen Sie im Installationsordner nach YD8116.exe.
- Verbinden Sie den YD9100 mit USB, aber noch nicht mit dem YD8116.
- starten Sie YD8116.exe mit einem Doppelklick.
- gehen Sie direkt zu “ES-PGM” und klicken Sie auf “Aktualisiere YD8116”.
- nach einem kurzen Moment erscheint die Meldung “Connect your device in bootloader mode”, klicken Sie jetzt noch nicht auf OK!
- Drücken und halten Sie die Programmiertaste am YD8116.
- stecken Sie das YD9100 in den ES-PGM-LINK des YD8116.
- Sobald die rote LED aufleuchtet, klicken Sie auf OK, während Sie die Programmiertaste gedrückt halten.
- Wenn die grüne LED schnell zu blinken beginnt, kann die Taste losgelassen werden.
- Wenn die Aktualisierung abgeschlossen ist, klicken Sie auf Werkseinstellung Zurücksetzen.
NEDERLANDS
- zoek in de installatie map naar YD8116.exe.
- verbind de YD9100 met USB, maar nog niet met de YD8116.
- start YD8116.exe met een dubbelklik.
- ga direct naar “ES-PGM” en klik op “Update YD8116”.
- na een klein moment verschijnt er de melding “Connect your device in bootloader mode”, nu nog niet op OK klikken!
- druk het programmeer knopje op de YD8116 in en houd deze ingedrukt.
- steek de YD9100 in de ES-PGM-LINK van de YD8116.
- zodra de rode LED brandt, klik op OK terwijl het programmeerknopje nog ingedrukt is.
- als de groene LED snel begint te flikkeren, kan het knopje losgelaten worden.
- als het updaten klaar is, klik dan op Fabrieksinstellingen terugzetten.
YD8116
Our YD8116 can be controlled either via “normal” DCC turnout addresses or via the relatively new DCCext format.
Briefly summarized, the difference:
With multi-aspect signals, switching via “normal” DCC addresses can become complicated. Different DCC switching commands must be combined in a certain time and sequence. This, of course, also consumes several DCC addresses.
If the DCCext format is used, only one DCC address is needed to control the different signal aspects for multi-aspect signals.
control. To the DCC address simply a value from 0 to 255 is sent. A specific signal aspect can be individually assigned to each value.
What is the advantage of DCCext?
- No complicated DCC address combinations have to be switched!
- The use of DCCext saves normal turnout addresses!
- Thus, as an example, for a DB H/V exit signal with four aspects, only one single turnout address is required, whereas conventionally two or more DCC addresses are required.
- Up to 255 switching aspects can be freely assigned.
For more detailed information, please refer to the RCN-213 standard. Please note that the command station you are using must support the DCCext format.
In certain circumstances, the YD8008/8044/8116 modules can become “bricked”.
That means, they are not accessible anymore after a firmware update, configuration attempt or a settings import.
Usually that shows by not being “seen” anymore in the configuration program and/or no LEDs lighting up anymore.
The procedure to get your module “back to life” is this:
(the example is for the YD8116. For other modules substitute YD8116 with the name of your module)
ENGLISH
- look for YD8116.exe in the installation folder.
- connect the YD9100 to USB, but not yet to the YD8116.
- start YD8116.exe with a double-click.
- go directly to “ES-PGM” and click on “Update YD8116”.
- after a short moment the message “Connect your device in bootloader mode” will appear, do not yet click OK now!
- Press and hold the programming button on the YD8116.
- plug the YD9100 into the ES-PGM-LINK of the YD8116.
- as soon as the red LED lights up, click OK while the programming button is still pressed.
- when the green LED starts flashing rapidly, the button can be released.
- when updating is complete, click Restore factory settings.
DEUTSCH
- Suchen Sie im Installationsordner nach YD8116.exe.
- Verbinden Sie den YD9100 mit USB, aber noch nicht mit dem YD8116.
- starten Sie YD8116.exe mit einem Doppelklick.
- gehen Sie direkt zu “ES-PGM” und klicken Sie auf “Aktualisiere YD8116”.
- nach einem kurzen Moment erscheint die Meldung “Connect your device in bootloader mode”, klicken Sie jetzt noch nicht auf OK!
- Drücken und halten Sie die Programmiertaste am YD8116.
- stecken Sie das YD9100 in den ES-PGM-LINK des YD8116.
- Sobald die rote LED aufleuchtet, klicken Sie auf OK, während Sie die Programmiertaste gedrückt halten.
- Wenn die grüne LED schnell zu blinken beginnt, kann die Taste losgelassen werden.
- Wenn die Aktualisierung abgeschlossen ist, klicken Sie auf Werkseinstellung Zurücksetzen.
NEDERLANDS
- zoek in de installatie map naar YD8116.exe.
- verbind de YD9100 met USB, maar nog niet met de YD8116.
- start YD8116.exe met een dubbelklik.
- ga direct naar “ES-PGM” en klik op “Update YD8116”.
- na een klein moment verschijnt er de melding “Connect your device in bootloader mode”, nu nog niet op OK klikken!
- druk het programmeer knopje op de YD8116 in en houd deze ingedrukt.
- steek de YD9100 in de ES-PGM-LINK van de YD8116.
- zodra de rode LED brandt, klik op OK terwijl het programmeerknopje nog ingedrukt is.
- als de groene LED snel begint te flikkeren, kan het knopje losgelaten worden.
- als het updaten klaar is, klik dan op Fabrieksinstellingen terugzetten.
YD9401
Comparing the DR5000 to an YD7001, one sees the following benefits:
- Mixed protocol environment possible, e.g. WLANmaus and HandyApp via Z21 and Traincontroller via Xpressnet, WDP or iTrain via LocoNet LAN.
- Use of LAN for Tool and MRR Software, as many have problems with USB.
- More WLAN clients than before.
- Feedback is no longer eaten away when using app and control software at the same time.
- USB stabilised with e.g. iTrain, WDP etc.
- New control panel that can be freely configured.
- DCCext signal control
- Loco functions up to 64
- Pom accessory decoder with corresponding hardware
- Distinction between emergency off and emergency stop without track voltage off.
- Indication of which connection to the YD7001 is currently active by green colouring of the corresponding COM port or the IP
- ES-Link functionality
- Improved feedback monitor both visually and technically (for example, the bell function)
- Guaranteed software maintenance
- Genuine technical support