General
While thinking about creating a new model railroad brand, somebody said: Oh no…. yet another company that produces model railroad stuff…
That was the base for our YaMoRC® brand name: Yet another Model Railroad Company.
After that a long process started to check the uniqueness of the brand name, whether it did not mean something indecent in any major language and not the least important whether the Internet Domain yamorc with all it’s extensions was still free.
In the end we concluded, that there is only one other organization in the whole world that uses the same acronym: The Yamaha Owners and Riders Club since this is a completely different branch of interest and this Club utilizes a different Internet Domain, we decided to take chance and the new brand name was born !
Well, a safe answer is: It Depends…
Although our founder and CEO, mr. Karst Drenth, designed and developed all the black DR4xxx and DR5xxx modules sold by Digikeijs, none of them can be supported in respect to the hardware and/or firmware/software. Digikeijs themselves are fully responsible for maintenance, support and repairs.
So we don’t provide any free-of-charge support/advice/troubleshooting for the black Digikeijs modules.
Well here is the story of our founder and CEO!
Karst started his model railroad career when he was 6 years old. Santa brought him his first Fleischmann train set. Years went by building layouts, “inventing” electrical solutions and playing intensely with his trains.
This interest for electricity and electronics brought him to Technical University, from which he graduated in 1984. Until 2003 the activity in model railroading was rather dormant. But then he bought his first Digital System, a Daisy I from Uhlenbrock. Converting locos to DCC and playing with that is nice, but the LocoNet present on that system was more interesting. Since, back then, only very expensive devices for linking train stuff to PCs existed, it was time for Karst to build something himself. John Jaber’s LocoBuffer was the piece of kit of choice.
This announced a new era in Karst’s model railroad career. After studying the LocoNet and DCC protocols, Karst started to design is own hardware. Interfaces ( LocoNet-PC-, XpressNet-Feedback-PC), Feedback modules, Servo decoders, Switch decoders etc.
Of course these activities did not pass unnoticed by fellow model railroaders. Many of them also wanted the devices Karst designed and produced in small scale. At the heydays, over 500 kits of the famous “ServoSwitch” were sold under Karst’s hobby-company KDesign Electronics.
Again that did not stay unnoticed either, but this time commercial interest arose. A company called Digirails showed interest in Karst’s designs and wanted to produce them in license. That initiative materialized and an almost 10 year long cooperation started between Karst and Digirails (later Digikeijs). Karst kept on designing: DR4088 series, DR4018, DR4024, DR5000, DR5033, DR5088RC, DR5013, DR5052 etc. etc.
In the same time period Karst also shared his vast knowledge as a designer and advisor for major model railroad companies.
In late 2019 the cooperation with Digikeijs came to an end. Both parties decided to go their own way, where Digikeijs bought the production and marketing rights for the “DR-portfolio”.
Mid 2020, Karst started designing a completely new portfolio under the wings of the Drenth Design & Consulting B.V. company, with the brand YaMoRC. Until 01-01-2022 Karst has been employed for 30 years as an Enterprise Architect in a major Dutch software company. As of then however Karst decided to devote the remaining years of his career to 100% model railroad. Be it (digital)electronics, models, scenery or what more can be thought of.
From now on, you just have to follow this site to stay informed about Karst’s activities !
Experience, over the past 10 years, with manufacturing electronics in the Far East showed that quality control is cumbersome. Even though contracts and agreements with Far East PCB assemblers are common practice, production quality fluctuates usually between 5 and 15% of DOA ( Dead On Arrival ) PCBs. Or, have “hidden” defects like bad soldering, which only show up when the modules are already mounted in/at/under your layout.
To overcome these bad-quality problems, YaMoRC has chosen to let it’s products being manufactured in Germany. YaMoRC has established a unique cooperation with one of the major German model railroad electronics companies. Being within an acceptable traveling distance, it enables YaMoRC to guide the production on-site to ensure flawless production. All products are subject to a test-run-assembly in presence of YaMoRC and verified and appraised on-site. It is that only after this verification process, the series-production continues. Needless to say, that the aforementioned company uses state of the art machinery for SMD and conventional components, as well as high quality, lead-free soldering. Also electronic components are sourced directly from reliable, well known suppliers/resellers in EU and/or USA.
Once the PCBs have been assembled and visually inspected, they are shipped to YaMoRC’s assembly- and test-facility in Apeldoorn, The Netherlands. There is where every (!!) PCB undergoes a comprehensive, fully automated test. Only after successful completion, the PCBs are assembled into their enclosure and are labeled with their respective sticker. Stays only the packaging into eco-friendly, natural, plastic-free, cardboard boxes.
So we proudly carry the quality label: “Made in Germany”, because Quality is Essential!
The manuals and firmware + configuration software can be found under the SERVICE tab in the product details of the respective product.
Note: The firmware and config software is identical for all modules. You just need to download and install it once for all modules 🙂
Example: Click here and then the SERVICE tab.
The printed press shows it’s interest in YaMoRC and wrote some nice articles:
- DiMo (DE), Digitale Modellbahn 2022-4: Rückmelder von plug-play bis high-end
- RailMagazine (NL), RailMagazine 401: Producten van YaMoRC
Products
Yes it can. That is, the YD8044 will sequentially switch the assigned turnouts in left to right order as seen in the image below.
Depending on how quickly the CDU will be recharged, the switching will appear more or less simultaneous.
Here Address #1 switches turnout on Out 1 and after that turnout on Out 2.
The YD8044 has very modest requirements on it’s power supply.
Due to it’s built-in CDU, the power supply never has to supply the switching coil-current. (which may be as high as 10 Amps)
The CDU charge current tops at a maximum of 350 mA at 19 V input voltage. So a 15 V / 0.5 Amp wall-wart adapter is fully sufficient to supply the YD8044.
Our YD8116 can be controlled either via “normal” DCC turnout addresses or via the relatively new DCCext format.
Briefly summarized, the difference:
With multi-aspect signals, switching via “normal” DCC addresses can become complicated. Different DCC switching commands must be combined in a certain time and sequence. This, of course, also consumes several DCC addresses.
If the DCCext format is used, only one DCC address is needed to control the different signal aspects for multi-aspect signals.
control. To the DCC address simply a value from 0 to 255 is sent. A specific signal aspect can be individually assigned to each value.
What is the advantage of DCCext?
- No complicated DCC address combinations have to be switched!
- The use of DCCext saves normal turnout addresses!
- Thus, as an example, for a DB H/V exit signal with four aspects, only one single turnout address is required, whereas conventionally two or more DCC addresses are required.
- Up to 255 switching aspects can be freely assigned.
For more detailed information, please refer to the RCN-213 standard. Please note that the command station you are using must support the DCCext format.
Comparing the DR5000 to an YD7001, one sees the following benefits:
- Mixed protocol environment possible, e.g. WLANmaus and HandyApp via Z21 and Traincontroller via Xpressnet, WDP or iTrain via LocoNet LAN.
- Use of LAN for Tool and MRR Software, as many have problems with USB.
- More WLAN clients than before.
- Feedback is no longer eaten away when using app and control software at the same time.
- USB stabilised with e.g. iTrain, WDP etc.
- New control panel that can be freely configured.
- DCCext signal control
- Loco functions up to 64
- Pom accessory decoder with corresponding hardware
- Distinction between emergency off and emergency stop without track voltage off.
- Indication of which connection to the YD7001 is currently active by green colouring of the corresponding COM port or the IP
- ES-Link functionality
- Improved feedback monitor both visually and technically (for example, the bell function)
- Guaranteed software maintenance
- Genuine technical support
In certain circumstances, the YD8008/8044/8116 modules can become “bricked”.
That means, they are not accessible anymore after a firmware update, configuration attempt or a settings import.
Usually that shows by not being “seen” anymore in the configuration program and/or no LEDs lighting up anymore.
The procedure to get your module “back to life” is this:
(the example is for the YD8116. For other modules substitute YD8116 with the name of your module)
ENGLISH
- look for YD8116.exe in the installation folder.
- connect the YD9100 to USB, but not yet to the YD8116.
- start YD8116.exe with a double-click.
- go directly to “ES-PGM” and click on “Update YD8116”.
- after a short moment the message “Connect your device in bootloader mode” will appear, do not yet click OK now!
- Press and hold the programming button on the YD8116.
- plug the YD9100 into the ES-PGM-LINK of the YD8116.
- as soon as the red LED lights up, click OK while the programming button is still pressed.
- when the green LED starts flashing rapidly, the button can be released.
- when updating is complete, click Restore factory settings.
DEUTSCH
- Suchen Sie im Installationsordner nach YD8116.exe.
- Verbinden Sie den YD9100 mit USB, aber noch nicht mit dem YD8116.
- starten Sie YD8116.exe mit einem Doppelklick.
- gehen Sie direkt zu “ES-PGM” und klicken Sie auf “Aktualisiere YD8116”.
- nach einem kurzen Moment erscheint die Meldung “Connect your device in bootloader mode”, klicken Sie jetzt noch nicht auf OK!
- Drücken und halten Sie die Programmiertaste am YD8116.
- stecken Sie das YD9100 in den ES-PGM-LINK des YD8116.
- Sobald die rote LED aufleuchtet, klicken Sie auf OK, während Sie die Programmiertaste gedrückt halten.
- Wenn die grüne LED schnell zu blinken beginnt, kann die Taste losgelassen werden.
- Wenn die Aktualisierung abgeschlossen ist, klicken Sie auf Werkseinstellung Zurücksetzen.
NEDERLANDS
- zoek in de installatie map naar YD8116.exe.
- verbind de YD9100 met USB, maar nog niet met de YD8116.
- start YD8116.exe met een dubbelklik.
- ga direct naar “ES-PGM” en klik op “Update YD8116”.
- na een klein moment verschijnt er de melding “Connect your device in bootloader mode”, nu nog niet op OK klikken!
- druk het programmeer knopje op de YD8116 in en houd deze ingedrukt.
- steek de YD9100 in de ES-PGM-LINK van de YD8116.
- zodra de rode LED brandt, klik op OK terwijl het programmeerknopje nog ingedrukt is.
- als de groene LED snel begint te flikkeren, kan het knopje losgelaten worden.
- als het updaten klaar is, klik dan op Fabrieksinstellingen terugzetten.
On a regular base, we get tickets from customers, stating that a Firmware Update to the YD7001/7010 failed.
A very common problem is, that before our software and drivers have been installed, the PC or Laptop already had installed some kind of Arduino related, or Atmel-based software. Unfortunately, this kind of software contains a bug. The bug lies in that it makes the YD70xx processor identify as an ATXMega128 instead of the correct ATXMega192 device.
So we mostly answer with: It sounds like a known problem:
You seem to have some erroronous Atmel drivers installed. They usually come (hidden) with Arduino or Arduino-based Products.
Solution:Â
- start update again.
- STOP and GO should be both on.
- search for the ATXMEGA128 device in Device Manager
- do a manual driver update with our drivers supplied in the YaMoRC installation directory
- Restart your DR5000
- Restart your PC
- Try again to update.
Regelmäßig erhalten wir Anfragen von Kunden, die angeben, dass ein Firmware-Update für den YD7001/7010 fehlgeschlagen ist.
Ein sehr häufiges Problem ist, dass vor der Installation unserer Software und Treiber auf dem PC oder Laptop bereits irgendeine Art von Arduino-bezogener oder Atmel-basierter Software installiert war. Leider enthält diese Art von Software einen Fehler. Der Fehler besteht darin, dass der YD70xx-Prozessor als ATXMega128 anstatt als ATXMega192 identifiziert wird.
Also antworten wir meistens mit: Das klingt nach einem bekannten Problem:
Sie scheinen einige fehlerhafte Atmel-Treiber installiert zu haben. Diese werden normalerweise (versteckt) mit Arduino oder Arduino-basierten Produkten geliefert.
Lösung:
- Starten Sie das Update erneut.
- STOP und GO sollten beide eingeschaltet sein.
- Suchen Sie im Gerätemanager nach dem ATXMEGA128-Gerät.
- Führen Sie ein manuelles Treiber-Update mit unseren Treibern aus dem YaMoRC-Installationsverzeichnis durch
- Starten Sie Ihren DR5000 neu
- Starten Sie Ihren PC neu
- Versuchen Sie erneut zu aktualisieren.
Technology
ES-Link is an open development of YaMoRC on the s88 bus. From that also emerges the name Extended S88 bus.
Physically It enables two adjacent YaMoRC modules to be interconnected by means of the ES-Link bridge: 
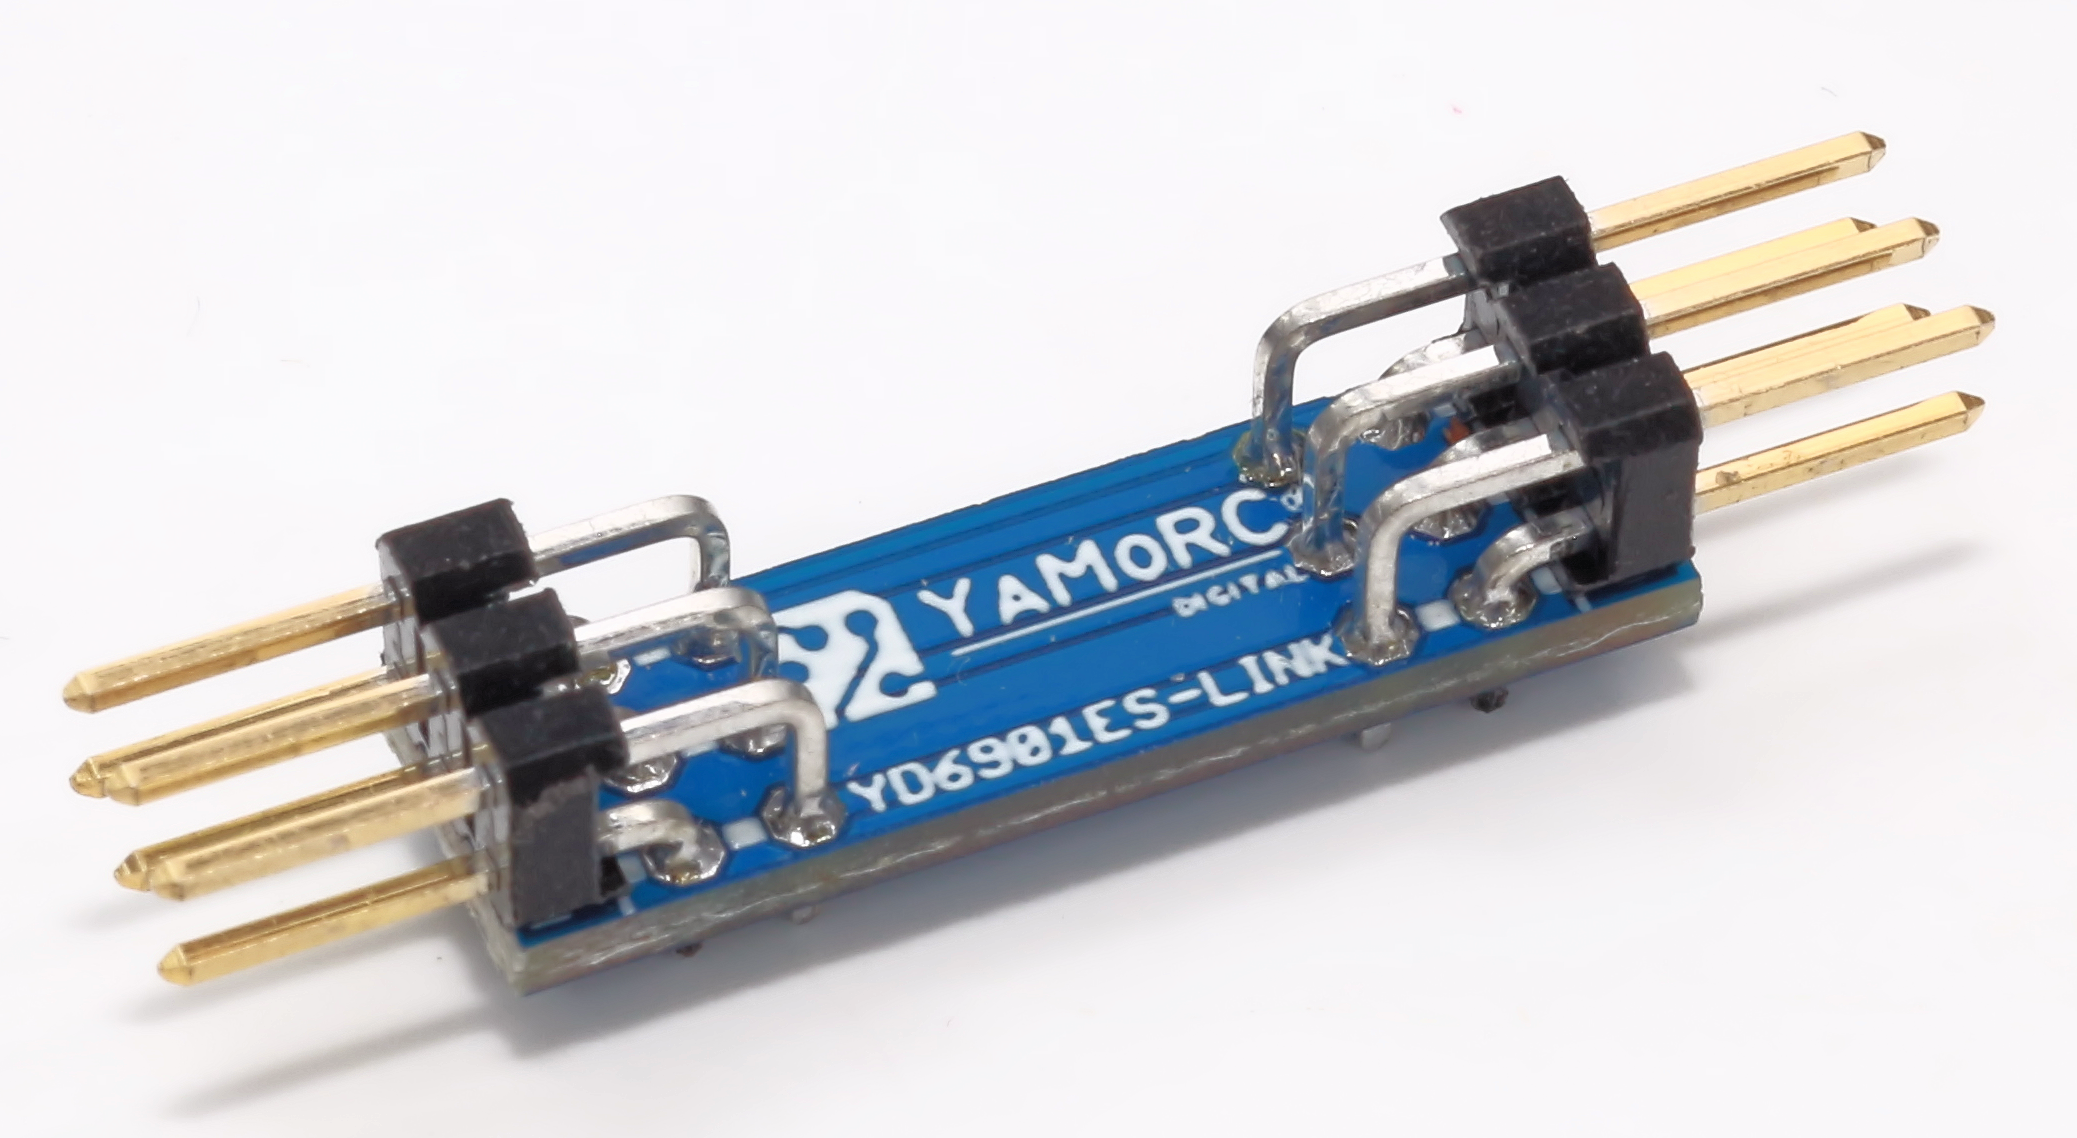
This comes in handy at the moment one e.g. wants to create a 32, 48 or larger input LocoNet feedback module by combining YD6016LN with multiple YD6016ES feedback modules.
Usually so called s88 Master modules come with one ES-Link connector: ES-IN-Link. This connector is usually present on most YaMoRC modules with a USB connection. In that case, the ES-IN-Link also provides bi-directional serial communication based on a UART protocol at 9600 Baud. This enables modules which do not have a USB connection, still to be configured and updated when connected to a module with ES-IN-Link.
Such USB-less modules can have either ES-PGM-Link or ES-OUT-Link connectors. Both are Identical and must be connected to an ES-IN-Link module.
Finally a module can have ES-IN-Link and as well ES-OUT-Link. Such modules can be daisy-chained and provide so called transparent- or pass-through-mode.
When not used in configuration mode, the ES-IN-Link presents a standard s88 connection to s88 Feedback units.
Examples:
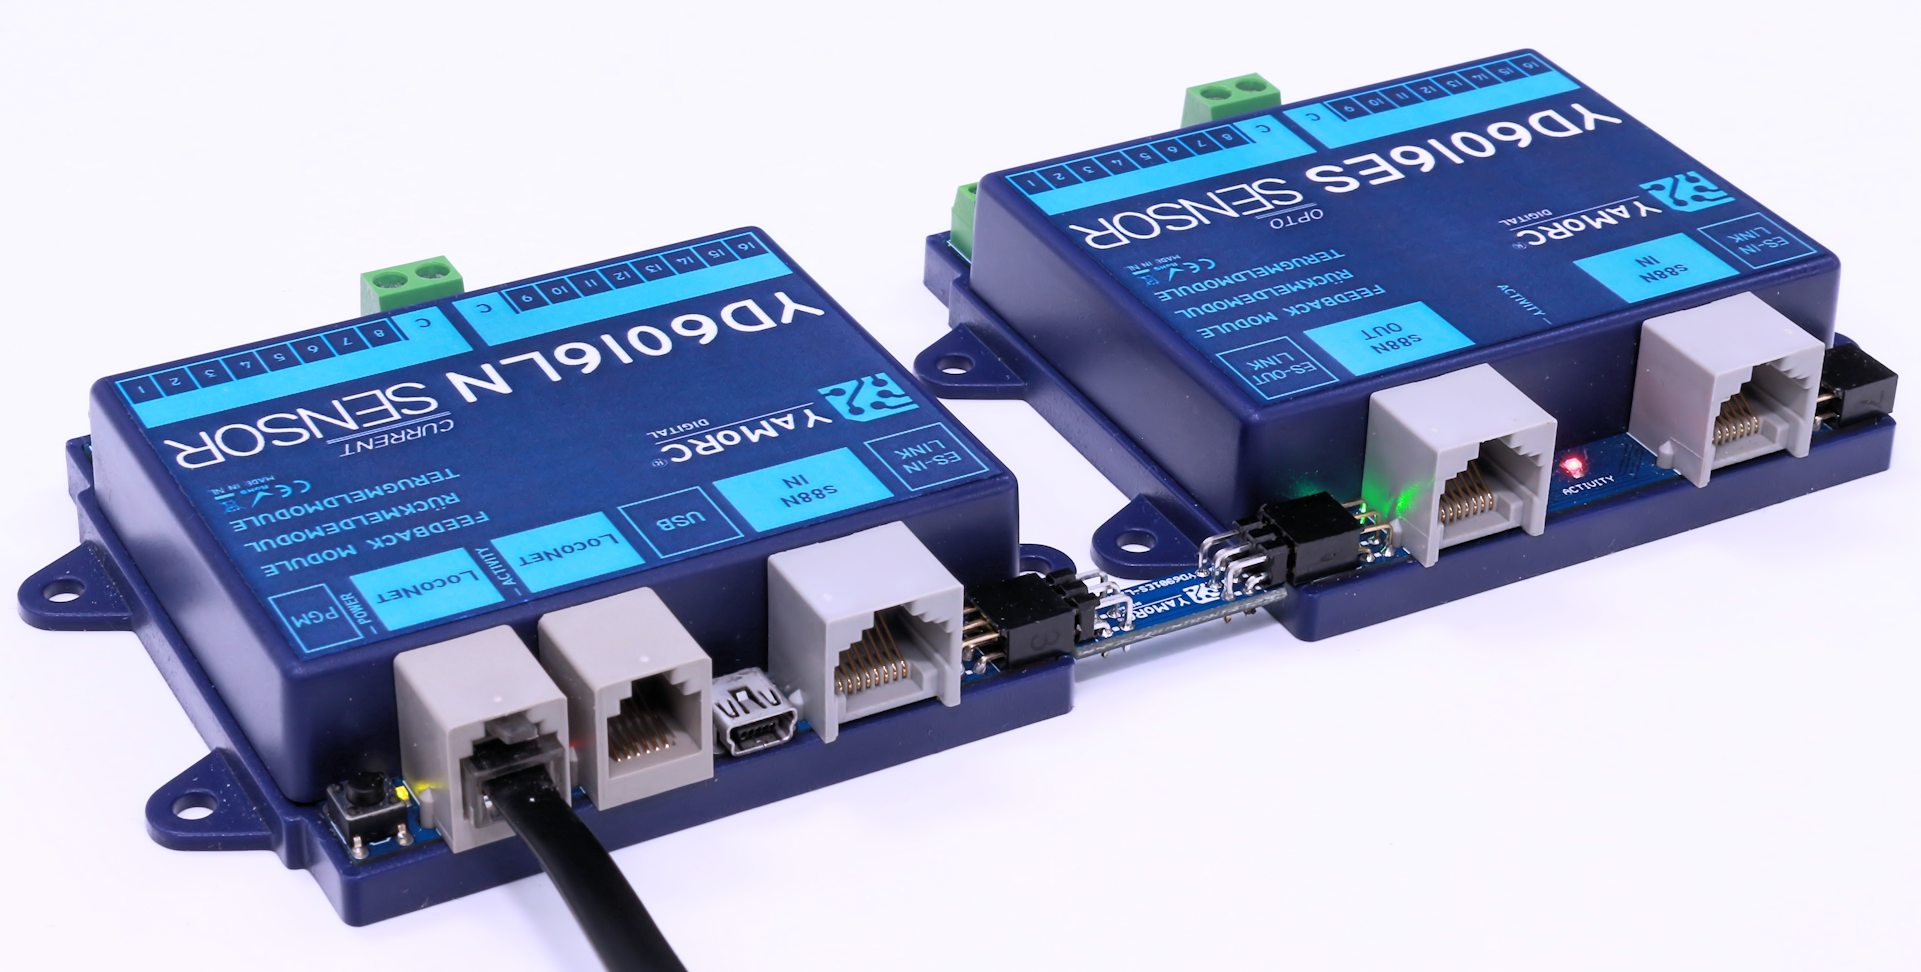
A 32-input LocoNet feedback module, created by combining YD6016ES and YD6016LN and the ES-Link stick.
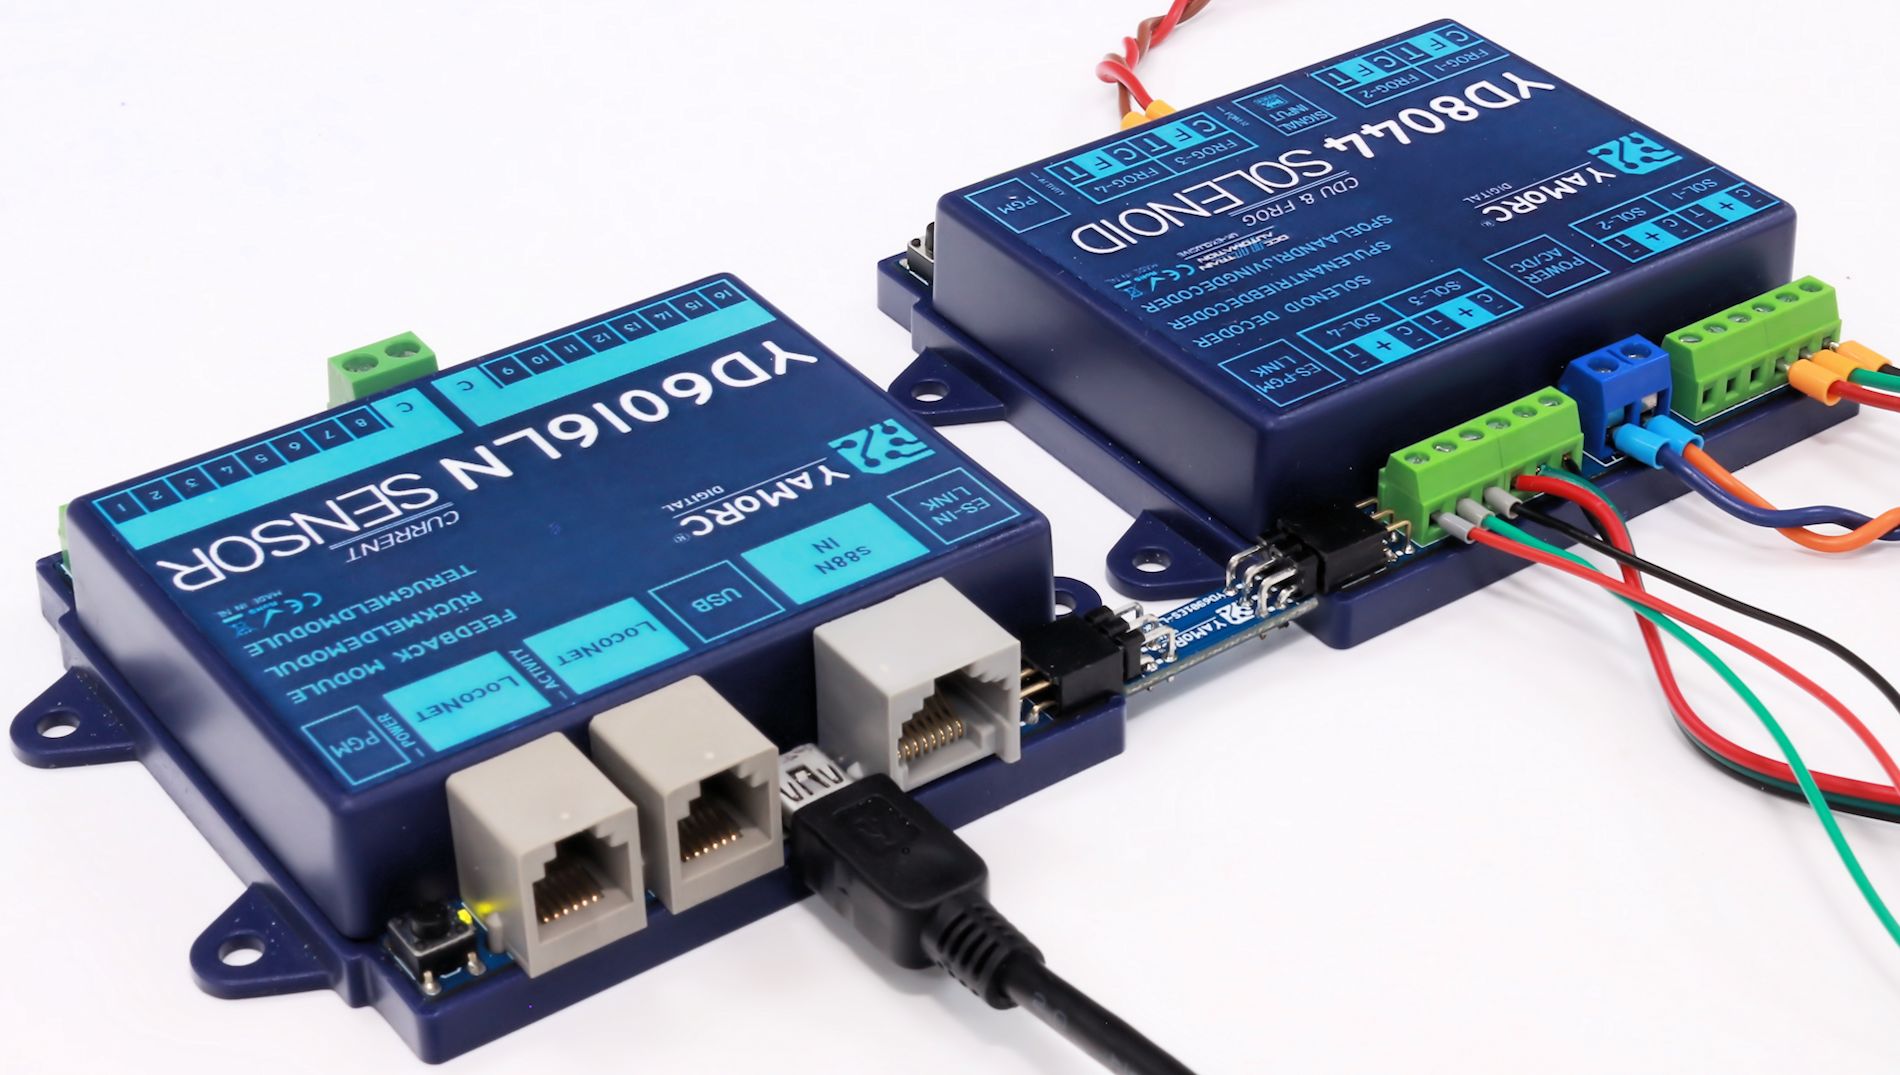
A YD8044 Decoder connected to a YD6016LN for configuration and update purposes.

Feedback modules often are referred to after the method of how their sensors work.
YaMoRC offers 4 types of feedback inout sensors:
- Current Sense: Inputs that measure the current that flows from rail to rail caused by e.g. a loco’s motor, headlamps etc. Also passenger cars with interior illumination or freight wagons with conductive wheel axles.
Usage: Track (section, block, turnout) occupation detection. - OPTO: Inputs that are galvanically isolated from the module electronics by means of an optocoupler. Having this isolation, enables two different power sources to be used for module and e.g. tracks.
- GND: This is the most simple input type. It detects feedback when the input is connected to ground (GND). The module provides a so called pull-up resistor to turn the feedback off in case the input is left “open”. An important note to this type of input is, that for detecting track events, it cannot be used with boosters that uses so-called H-Bridges!
- RailCom: This type of input is able to detect messages coming from the loco sent by a RailCom enabled decoder. The module translates those messages in feedback messages to the command station. It is mainly used to detect which loco (address) is present in a stretch of track. For vehicles without a RailCom enabled decoder, this type also works as a Current Sense input.
Our YD8116 can be controlled either via “normal” DCC turnout addresses or via the relatively new DCCext format.
Briefly summarized, the difference:
With multi-aspect signals, switching via “normal” DCC addresses can become complicated. Different DCC switching commands must be combined in a certain time and sequence. This, of course, also consumes several DCC addresses.
If the DCCext format is used, only one DCC address is needed to control the different signal aspects for multi-aspect signals.
control. To the DCC address simply a value from 0 to 255 is sent. A specific signal aspect can be individually assigned to each value.
What is the advantage of DCCext?
- No complicated DCC address combinations have to be switched!
- The use of DCCext saves normal turnout addresses!
- Thus, as an example, for a DB H/V exit signal with four aspects, only one single turnout address is required, whereas conventionally two or more DCC addresses are required.
- Up to 255 switching aspects can be freely assigned.
For more detailed information, please refer to the RCN-213 standard. Please note that the command station you are using must support the DCCext format.
Comparing the DR5000 to an YD7001, one sees the following benefits:
- Mixed protocol environment possible, e.g. WLANmaus and HandyApp via Z21 and Traincontroller via Xpressnet, WDP or iTrain via LocoNet LAN.
- Use of LAN for Tool and MRR Software, as many have problems with USB.
- More WLAN clients than before.
- Feedback is no longer eaten away when using app and control software at the same time.
- USB stabilised with e.g. iTrain, WDP etc.
- New control panel that can be freely configured.
- DCCext signal control
- Loco functions up to 64
- Pom accessory decoder with corresponding hardware
- Distinction between emergency off and emergency stop without track voltage off.
- Indication of which connection to the YD7001 is currently active by green colouring of the corresponding COM port or the IP
- ES-Link functionality
- Improved feedback monitor both visually and technically (for example, the bell function)
- Guaranteed software maintenance
- Genuine technical support
YD7001
On a regular base, we get tickets from customers, stating that a Firmware Update to the YD7001/7010 failed.
A very common problem is, that before our software and drivers have been installed, the PC or Laptop already had installed some kind of Arduino related, or Atmel-based software. Unfortunately, this kind of software contains a bug. The bug lies in that it makes the YD70xx processor identify as an ATXMega128 instead of the correct ATXMega192 device.
So we mostly answer with: It sounds like a known problem:
You seem to have some erroronous Atmel drivers installed. They usually come (hidden) with Arduino or Arduino-based Products.
Solution:Â
- start update again.
- STOP and GO should be both on.
- search for the ATXMEGA128 device in Device Manager
- do a manual driver update with our drivers supplied in the YaMoRC installation directory
- Restart your DR5000
- Restart your PC
- Try again to update.
Regelmäßig erhalten wir Anfragen von Kunden, die angeben, dass ein Firmware-Update für den YD7001/7010 fehlgeschlagen ist.
Ein sehr häufiges Problem ist, dass vor der Installation unserer Software und Treiber auf dem PC oder Laptop bereits irgendeine Art von Arduino-bezogener oder Atmel-basierter Software installiert war. Leider enthält diese Art von Software einen Fehler. Der Fehler besteht darin, dass der YD70xx-Prozessor als ATXMega128 anstatt als ATXMega192 identifiziert wird.
Also antworten wir meistens mit: Das klingt nach einem bekannten Problem:
Sie scheinen einige fehlerhafte Atmel-Treiber installiert zu haben. Diese werden normalerweise (versteckt) mit Arduino oder Arduino-basierten Produkten geliefert.
Lösung:
- Starten Sie das Update erneut.
- STOP und GO sollten beide eingeschaltet sein.
- Suchen Sie im Gerätemanager nach dem ATXMEGA128-Gerät.
- Führen Sie ein manuelles Treiber-Update mit unseren Treibern aus dem YaMoRC-Installationsverzeichnis durch
- Starten Sie Ihren DR5000 neu
- Starten Sie Ihren PC neu
- Versuchen Sie erneut zu aktualisieren.
YD7001-E
On a regular base, we get tickets from customers, stating that a Firmware Update to the YD7001/7010 failed.
A very common problem is, that before our software and drivers have been installed, the PC or Laptop already had installed some kind of Arduino related, or Atmel-based software. Unfortunately, this kind of software contains a bug. The bug lies in that it makes the YD70xx processor identify as an ATXMega128 instead of the correct ATXMega192 device.
So we mostly answer with: It sounds like a known problem:
You seem to have some erroronous Atmel drivers installed. They usually come (hidden) with Arduino or Arduino-based Products.
Solution:Â
- start update again.
- STOP and GO should be both on.
- search for the ATXMEGA128 device in Device Manager
- do a manual driver update with our drivers supplied in the YaMoRC installation directory
- Restart your DR5000
- Restart your PC
- Try again to update.
Regelmäßig erhalten wir Anfragen von Kunden, die angeben, dass ein Firmware-Update für den YD7001/7010 fehlgeschlagen ist.
Ein sehr häufiges Problem ist, dass vor der Installation unserer Software und Treiber auf dem PC oder Laptop bereits irgendeine Art von Arduino-bezogener oder Atmel-basierter Software installiert war. Leider enthält diese Art von Software einen Fehler. Der Fehler besteht darin, dass der YD70xx-Prozessor als ATXMega128 anstatt als ATXMega192 identifiziert wird.
Also antworten wir meistens mit: Das klingt nach einem bekannten Problem:
Sie scheinen einige fehlerhafte Atmel-Treiber installiert zu haben. Diese werden normalerweise (versteckt) mit Arduino oder Arduino-basierten Produkten geliefert.
Lösung:
- Starten Sie das Update erneut.
- STOP und GO sollten beide eingeschaltet sein.
- Suchen Sie im Gerätemanager nach dem ATXMEGA128-Gerät.
- Führen Sie ein manuelles Treiber-Update mit unseren Treibern aus dem YaMoRC-Installationsverzeichnis durch
- Starten Sie Ihren DR5000 neu
- Starten Sie Ihren PC neu
- Versuchen Sie erneut zu aktualisieren.
YD7010
On a regular base, we get tickets from customers, stating that a Firmware Update to the YD7001/7010 failed.
A very common problem is, that before our software and drivers have been installed, the PC or Laptop already had installed some kind of Arduino related, or Atmel-based software. Unfortunately, this kind of software contains a bug. The bug lies in that it makes the YD70xx processor identify as an ATXMega128 instead of the correct ATXMega192 device.
So we mostly answer with: It sounds like a known problem:
You seem to have some erroronous Atmel drivers installed. They usually come (hidden) with Arduino or Arduino-based Products.
Solution:Â
- start update again.
- STOP and GO should be both on.
- search for the ATXMEGA128 device in Device Manager
- do a manual driver update with our drivers supplied in the YaMoRC installation directory
- Restart your DR5000
- Restart your PC
- Try again to update.
Regelmäßig erhalten wir Anfragen von Kunden, die angeben, dass ein Firmware-Update für den YD7001/7010 fehlgeschlagen ist.
Ein sehr häufiges Problem ist, dass vor der Installation unserer Software und Treiber auf dem PC oder Laptop bereits irgendeine Art von Arduino-bezogener oder Atmel-basierter Software installiert war. Leider enthält diese Art von Software einen Fehler. Der Fehler besteht darin, dass der YD70xx-Prozessor als ATXMega128 anstatt als ATXMega192 identifiziert wird.
Also antworten wir meistens mit: Das klingt nach einem bekannten Problem:
Sie scheinen einige fehlerhafte Atmel-Treiber installiert zu haben. Diese werden normalerweise (versteckt) mit Arduino oder Arduino-basierten Produkten geliefert.
Lösung:
- Starten Sie das Update erneut.
- STOP und GO sollten beide eingeschaltet sein.
- Suchen Sie im Gerätemanager nach dem ATXMEGA128-Gerät.
- Führen Sie ein manuelles Treiber-Update mit unseren Treibern aus dem YaMoRC-Installationsverzeichnis durch
- Starten Sie Ihren DR5000 neu
- Starten Sie Ihren PC neu
- Versuchen Sie erneut zu aktualisieren.
YD8008
In certain circumstances, the YD8008/8044/8116 modules can become “bricked”.
That means, they are not accessible anymore after a firmware update, configuration attempt or a settings import.
Usually that shows by not being “seen” anymore in the configuration program and/or no LEDs lighting up anymore.
The procedure to get your module “back to life” is this:
(the example is for the YD8116. For other modules substitute YD8116 with the name of your module)
ENGLISH
- look for YD8116.exe in the installation folder.
- connect the YD9100 to USB, but not yet to the YD8116.
- start YD8116.exe with a double-click.
- go directly to “ES-PGM” and click on “Update YD8116”.
- after a short moment the message “Connect your device in bootloader mode” will appear, do not yet click OK now!
- Press and hold the programming button on the YD8116.
- plug the YD9100 into the ES-PGM-LINK of the YD8116.
- as soon as the red LED lights up, click OK while the programming button is still pressed.
- when the green LED starts flashing rapidly, the button can be released.
- when updating is complete, click Restore factory settings.
DEUTSCH
- Suchen Sie im Installationsordner nach YD8116.exe.
- Verbinden Sie den YD9100 mit USB, aber noch nicht mit dem YD8116.
- starten Sie YD8116.exe mit einem Doppelklick.
- gehen Sie direkt zu “ES-PGM” und klicken Sie auf “Aktualisiere YD8116”.
- nach einem kurzen Moment erscheint die Meldung “Connect your device in bootloader mode”, klicken Sie jetzt noch nicht auf OK!
- Drücken und halten Sie die Programmiertaste am YD8116.
- stecken Sie das YD9100 in den ES-PGM-LINK des YD8116.
- Sobald die rote LED aufleuchtet, klicken Sie auf OK, während Sie die Programmiertaste gedrückt halten.
- Wenn die grüne LED schnell zu blinken beginnt, kann die Taste losgelassen werden.
- Wenn die Aktualisierung abgeschlossen ist, klicken Sie auf Werkseinstellung Zurücksetzen.
NEDERLANDS
- zoek in de installatie map naar YD8116.exe.
- verbind de YD9100 met USB, maar nog niet met de YD8116.
- start YD8116.exe met een dubbelklik.
- ga direct naar “ES-PGM” en klik op “Update YD8116”.
- na een klein moment verschijnt er de melding “Connect your device in bootloader mode”, nu nog niet op OK klikken!
- druk het programmeer knopje op de YD8116 in en houd deze ingedrukt.
- steek de YD9100 in de ES-PGM-LINK van de YD8116.
- zodra de rode LED brandt, klik op OK terwijl het programmeerknopje nog ingedrukt is.
- als de groene LED snel begint te flikkeren, kan het knopje losgelaten worden.
- als het updaten klaar is, klik dan op Fabrieksinstellingen terugzetten.
YD8044
Yes it can. That is, the YD8044 will sequentially switch the assigned turnouts in left to right order as seen in the image below.
Depending on how quickly the CDU will be recharged, the switching will appear more or less simultaneous.
Here Address #1 switches turnout on Out 1 and after that turnout on Out 2.
The YD8044 has very modest requirements on it’s power supply.
Due to it’s built-in CDU, the power supply never has to supply the switching coil-current. (which may be as high as 10 Amps)
The CDU charge current tops at a maximum of 350 mA at 19 V input voltage. So a 15 V / 0.5 Amp wall-wart adapter is fully sufficient to supply the YD8044.
In certain circumstances, the YD8008/8044/8116 modules can become “bricked”.
That means, they are not accessible anymore after a firmware update, configuration attempt or a settings import.
Usually that shows by not being “seen” anymore in the configuration program and/or no LEDs lighting up anymore.
The procedure to get your module “back to life” is this:
(the example is for the YD8116. For other modules substitute YD8116 with the name of your module)
ENGLISH
- look for YD8116.exe in the installation folder.
- connect the YD9100 to USB, but not yet to the YD8116.
- start YD8116.exe with a double-click.
- go directly to “ES-PGM” and click on “Update YD8116”.
- after a short moment the message “Connect your device in bootloader mode” will appear, do not yet click OK now!
- Press and hold the programming button on the YD8116.
- plug the YD9100 into the ES-PGM-LINK of the YD8116.
- as soon as the red LED lights up, click OK while the programming button is still pressed.
- when the green LED starts flashing rapidly, the button can be released.
- when updating is complete, click Restore factory settings.
DEUTSCH
- Suchen Sie im Installationsordner nach YD8116.exe.
- Verbinden Sie den YD9100 mit USB, aber noch nicht mit dem YD8116.
- starten Sie YD8116.exe mit einem Doppelklick.
- gehen Sie direkt zu “ES-PGM” und klicken Sie auf “Aktualisiere YD8116”.
- nach einem kurzen Moment erscheint die Meldung “Connect your device in bootloader mode”, klicken Sie jetzt noch nicht auf OK!
- Drücken und halten Sie die Programmiertaste am YD8116.
- stecken Sie das YD9100 in den ES-PGM-LINK des YD8116.
- Sobald die rote LED aufleuchtet, klicken Sie auf OK, während Sie die Programmiertaste gedrückt halten.
- Wenn die grüne LED schnell zu blinken beginnt, kann die Taste losgelassen werden.
- Wenn die Aktualisierung abgeschlossen ist, klicken Sie auf Werkseinstellung Zurücksetzen.
NEDERLANDS
- zoek in de installatie map naar YD8116.exe.
- verbind de YD9100 met USB, maar nog niet met de YD8116.
- start YD8116.exe met een dubbelklik.
- ga direct naar “ES-PGM” en klik op “Update YD8116”.
- na een klein moment verschijnt er de melding “Connect your device in bootloader mode”, nu nog niet op OK klikken!
- druk het programmeer knopje op de YD8116 in en houd deze ingedrukt.
- steek de YD9100 in de ES-PGM-LINK van de YD8116.
- zodra de rode LED brandt, klik op OK terwijl het programmeerknopje nog ingedrukt is.
- als de groene LED snel begint te flikkeren, kan het knopje losgelaten worden.
- als het updaten klaar is, klik dan op Fabrieksinstellingen terugzetten.
YD8116
Our YD8116 can be controlled either via “normal” DCC turnout addresses or via the relatively new DCCext format.
Briefly summarized, the difference:
With multi-aspect signals, switching via “normal” DCC addresses can become complicated. Different DCC switching commands must be combined in a certain time and sequence. This, of course, also consumes several DCC addresses.
If the DCCext format is used, only one DCC address is needed to control the different signal aspects for multi-aspect signals.
control. To the DCC address simply a value from 0 to 255 is sent. A specific signal aspect can be individually assigned to each value.
What is the advantage of DCCext?
- No complicated DCC address combinations have to be switched!
- The use of DCCext saves normal turnout addresses!
- Thus, as an example, for a DB H/V exit signal with four aspects, only one single turnout address is required, whereas conventionally two or more DCC addresses are required.
- Up to 255 switching aspects can be freely assigned.
For more detailed information, please refer to the RCN-213 standard. Please note that the command station you are using must support the DCCext format.
In certain circumstances, the YD8008/8044/8116 modules can become “bricked”.
That means, they are not accessible anymore after a firmware update, configuration attempt or a settings import.
Usually that shows by not being “seen” anymore in the configuration program and/or no LEDs lighting up anymore.
The procedure to get your module “back to life” is this:
(the example is for the YD8116. For other modules substitute YD8116 with the name of your module)
ENGLISH
- look for YD8116.exe in the installation folder.
- connect the YD9100 to USB, but not yet to the YD8116.
- start YD8116.exe with a double-click.
- go directly to “ES-PGM” and click on “Update YD8116”.
- after a short moment the message “Connect your device in bootloader mode” will appear, do not yet click OK now!
- Press and hold the programming button on the YD8116.
- plug the YD9100 into the ES-PGM-LINK of the YD8116.
- as soon as the red LED lights up, click OK while the programming button is still pressed.
- when the green LED starts flashing rapidly, the button can be released.
- when updating is complete, click Restore factory settings.
DEUTSCH
- Suchen Sie im Installationsordner nach YD8116.exe.
- Verbinden Sie den YD9100 mit USB, aber noch nicht mit dem YD8116.
- starten Sie YD8116.exe mit einem Doppelklick.
- gehen Sie direkt zu “ES-PGM” und klicken Sie auf “Aktualisiere YD8116”.
- nach einem kurzen Moment erscheint die Meldung “Connect your device in bootloader mode”, klicken Sie jetzt noch nicht auf OK!
- Drücken und halten Sie die Programmiertaste am YD8116.
- stecken Sie das YD9100 in den ES-PGM-LINK des YD8116.
- Sobald die rote LED aufleuchtet, klicken Sie auf OK, während Sie die Programmiertaste gedrückt halten.
- Wenn die grüne LED schnell zu blinken beginnt, kann die Taste losgelassen werden.
- Wenn die Aktualisierung abgeschlossen ist, klicken Sie auf Werkseinstellung Zurücksetzen.
NEDERLANDS
- zoek in de installatie map naar YD8116.exe.
- verbind de YD9100 met USB, maar nog niet met de YD8116.
- start YD8116.exe met een dubbelklik.
- ga direct naar “ES-PGM” en klik op “Update YD8116”.
- na een klein moment verschijnt er de melding “Connect your device in bootloader mode”, nu nog niet op OK klikken!
- druk het programmeer knopje op de YD8116 in en houd deze ingedrukt.
- steek de YD9100 in de ES-PGM-LINK van de YD8116.
- zodra de rode LED brandt, klik op OK terwijl het programmeerknopje nog ingedrukt is.
- als de groene LED snel begint te flikkeren, kan het knopje losgelaten worden.
- als het updaten klaar is, klik dan op Fabrieksinstellingen terugzetten.
YD9401
Comparing the DR5000 to an YD7001, one sees the following benefits:
- Mixed protocol environment possible, e.g. WLANmaus and HandyApp via Z21 and Traincontroller via Xpressnet, WDP or iTrain via LocoNet LAN.
- Use of LAN for Tool and MRR Software, as many have problems with USB.
- More WLAN clients than before.
- Feedback is no longer eaten away when using app and control software at the same time.
- USB stabilised with e.g. iTrain, WDP etc.
- New control panel that can be freely configured.
- DCCext signal control
- Loco functions up to 64
- Pom accessory decoder with corresponding hardware
- Distinction between emergency off and emergency stop without track voltage off.
- Indication of which connection to the YD7001 is currently active by green colouring of the corresponding COM port or the IP
- ES-Link functionality
- Improved feedback monitor both visually and technically (for example, the bell function)
- Guaranteed software maintenance
- Genuine technical support
On a regular base, we get tickets from customers, stating that a Firmware Update to the YD7001/7010 failed.
A very common problem is, that before our software and drivers have been installed, the PC or Laptop already had installed some kind of Arduino related, or Atmel-based software. Unfortunately, this kind of software contains a bug. The bug lies in that it makes the YD70xx processor identify as an ATXMega128 instead of the correct ATXMega192 device.
So we mostly answer with: It sounds like a known problem:
You seem to have some erroronous Atmel drivers installed. They usually come (hidden) with Arduino or Arduino-based Products.
Solution:Â
- start update again.
- STOP and GO should be both on.
- search for the ATXMEGA128 device in Device Manager
- do a manual driver update with our drivers supplied in the YaMoRC installation directory
- Restart your DR5000
- Restart your PC
- Try again to update.
Regelmäßig erhalten wir Anfragen von Kunden, die angeben, dass ein Firmware-Update für den YD7001/7010 fehlgeschlagen ist.
Ein sehr häufiges Problem ist, dass vor der Installation unserer Software und Treiber auf dem PC oder Laptop bereits irgendeine Art von Arduino-bezogener oder Atmel-basierter Software installiert war. Leider enthält diese Art von Software einen Fehler. Der Fehler besteht darin, dass der YD70xx-Prozessor als ATXMega128 anstatt als ATXMega192 identifiziert wird.
Also antworten wir meistens mit: Das klingt nach einem bekannten Problem:
Sie scheinen einige fehlerhafte Atmel-Treiber installiert zu haben. Diese werden normalerweise (versteckt) mit Arduino oder Arduino-basierten Produkten geliefert.
Lösung:
- Starten Sie das Update erneut.
- STOP und GO sollten beide eingeschaltet sein.
- Suchen Sie im Gerätemanager nach dem ATXMEGA128-Gerät.
- Führen Sie ein manuelles Treiber-Update mit unseren Treibern aus dem YaMoRC-Installationsverzeichnis durch
- Starten Sie Ihren DR5000 neu
- Starten Sie Ihren PC neu
- Versuchen Sie erneut zu aktualisieren.